
What is your perfect squat stance and how do you find it?
Feet shoulder width apart, toes pointed out slightly, bend the knees as you sit your hips back, don’t let your knees pass over your toes. When it comes to the squat, these are all cues you’ve likely heard in the past. While none are inherently “bad” cues, depending on the person and the goal at hand, these have become arbitrary standards. Something you’d hear from a gym teacher as he hikes up his shorts, yelling at his students.

Personally, it took me years to know that I wasn’t squatting in my ideal foot positioning. I didn’t even know I could adjust my stance for more comfort, longevity and power. I was still able to squat with relatively good mechanics, but once I found it, it clicked, and squats felt better. I was able to drive more power through my feet and naturally keep an upright position.
I believe that anyone can squat in any stance (play around with your options! Life doesn’t happen in a perfect, square-footed stance.). However, the depth, power and overall purpose of a squat will vary with the stance of the individual. The squat is a fundamental movement pattern that should be explored frequently. Remember, even if you currently don’t have a “beautiful squat” that feels comfortable, it doesn't mean you can’t attain it!
This article is a guide to why your squat won’t look the same as the person next to you and will explain how to begin finding your ideal foot positioning! For the sake of consistency, we will be referring to barbell back squats throughout this article.
Let’s keep it simple, here are the contents:
1: Hip Anatomy & Anthropometry (measurements and proportions of the body)
2: Mobility Requirements & Assessments
3: Finding Your Stance
4: Lifters, flat shoes or bare feet?
5: Squat Hold Protocol
Ready to dive in?

1: Hip Anatomy & Anthropometry
Hip anatomy and anthropometry has a large impact on how you squat, and you have no control over it. Once you begin to see how vastly different the structure of our bodies can be, you will understand why it’s insane to assume that everyone should be squatting with the same stance and perfectly upright body. It’s just not possible!
Hip anatomy is referring to the structure of the hip joint. It is the relationship between the hip socket (acetabulum) and the femoral head (the top of your femur bone and sits within the acetabulum). Anthropometry is referring to how long your limbs are (the shins and femurs are most relevant for today's chat).
Hip Anatomy
The hip is a ball in socket joint, meaning that the femoral head fits into the hip socket like a fist fits into a cupped hand. The two main ways that these two pieces of the puzzle can vary are:
- The femoral head can sit in one of many different possible angles
- The hip socket can vary in depth (think a plate vs a bowl)
Your unique variation of the two will play a big part in how you can achieve your deepest squat.
Femoral Head
Below are 2 photos of a femoral head in varying angles. The femoral head on the left (in both photos) is at a more flattened angle, which we call retroversion while the one on the right is at a slight angle forward which is called anteversion.

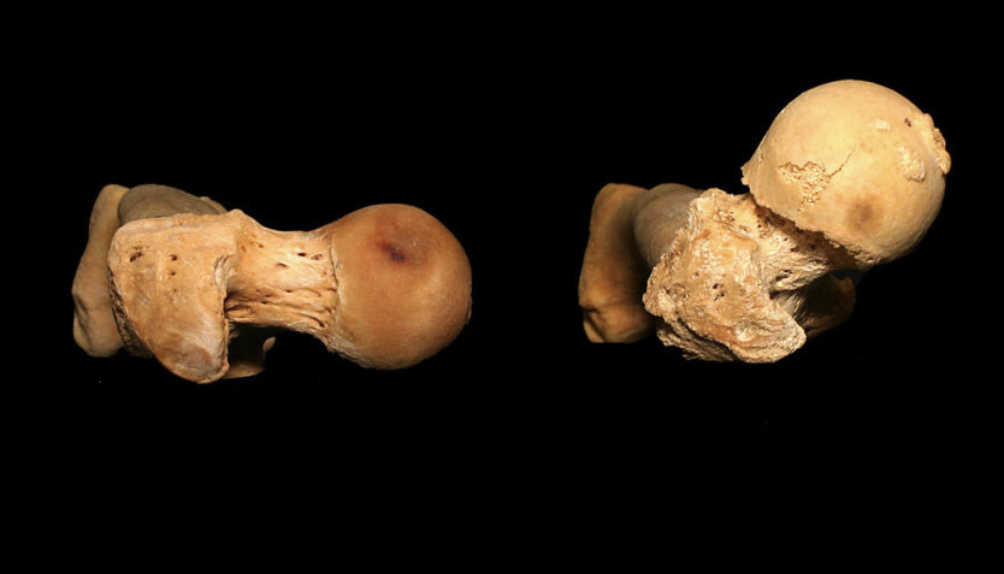
Why does this matter?

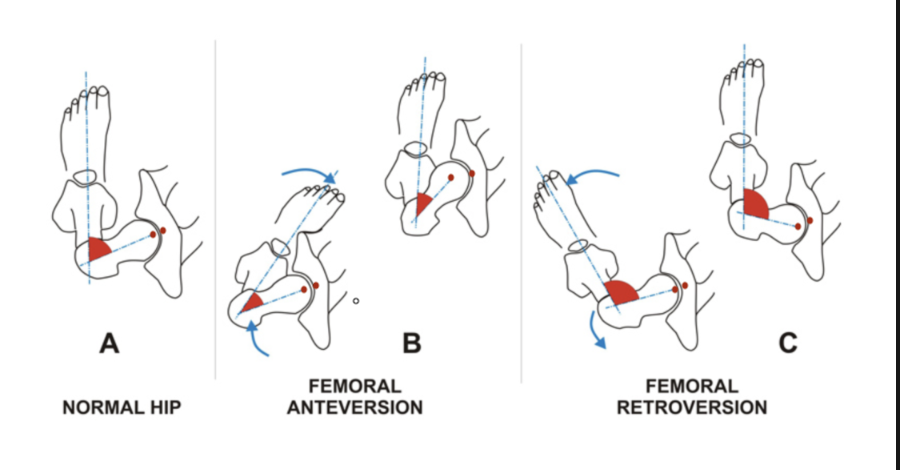
For an anteverted femur to sit flush in the hip socket, it will have to internally rotate slightly because of the angle it sits. Requiring a “toes-pointed-forward” foot position in the squat. For a retroverted femur to sit flush in the hip socket, it will have to externally rotate. Which means this anatomy will require a “toe-pointed-out” foot position. If the femur externally or internally rotates, the foot position will have to pivot in the same direction.

Take a look at the photo below. The red dots indicate how the femoral head is or is not sitting flush within the hip socket depending on the angle.
Hip Socket
The hips are attached to the pelvis which attaches the spine. The relevance of this becomes obvious when you notice discomfort or clear movement compensations coming from the lumbar spine (think butt wink). That is a whole other topic and for the sake of context, understand that compensations in this area during a squat are rarely a low back issue, but more often a hip or ankle issue.
The depth and angle of the hip socket can vary as well. This will also dictate the level of internal or external rotation required from the femoral head in order to sit flush within the socket.
Below are some photos to show uniqueness.


These photos give a clear view of how vastly different anatomy can be.
Anthropometry
Anthropometry simply means the measurement of the human body. In reference to the squat, we are mostly looking at the length of the femur and the tibia while taking into consideration torso positioning. Depending on the length of the tibia and femur, your stance will dictate how far forward you will have to lean with your upper body to stop yourself from falling backwards.
Hip anatomy can be more challenging to understand because we are unable to see what's going on inside the hips. Anthropometry allows you to get a better idea simply by looking at your body (you can also take a video or photo of your squat to see).
Someone with longer limbs will naturally have a wider stance to manage the desired upright position. Coach V Is a great example of someone with long limbs and retroverted hips that is forced into a wider stance. In the photos she is displaying how her upper body is forced to lean forward when she squats with a more narrow, toe forward stance.


Whereas someone like myself can manage a more narrow stance due to shorter limbs and anteverted hips.

I could squat in a wide squat stance, and Coach V could squat with a more narrow stance however depth and power would be sacrificed. There are no “good” or “bad” positions for your feet, there are ideal stances depending on the goal you’re looking to achieve.
2: Mobility Requirements & Assessments
This is where it starts to get fun. Everything mentioned above you have no control over. You simply can’t change your anatomy or the length of your body. If that were possible I’d be much taller (if only dead hangs could make me taller). Something you do have control over is your mobility.
Squatting is a beautiful art. It’s a basic, fundamental movement that we use many times throughout our daily life, requiring synchronous movement from the ankles, knees and hips. If you are working within your ideal squat stance and struggling with mobility in these 3 areas, you will be forced to compensate.
These are the most common compensations:
1: Lack of depth
2: Butt wink
3: Forward lean
It is worth looking at your ankle and hip mobility if you struggle with any of these compensations. Usually, knees are not the culprit of poor squat mobility. If you can bend your knee past 90º then your knees have the capabilities to perform a squat past 90º.
Here are some quick simple assessment tests you can do for both the ankles and hips.
Ankles
The ankles and feet are quite complex, a very common mobility limitation that hinders squat depth and mechanics is ankle dorsiflexion. Here are 2 tests you can perform to test your knee-over-toe capabilities. This will help to understand if the ankles are restricted both actively and passively, and if there are any imbalances. Remember that anatomy is unique to you as an individual and mobility training is nuanced. Everything mentioned is a general place to start.
Passive Dorsiflexion Test

Grab a stick (a broom stick is a great option as you can finally clean your messy house afterward) and plant it a fist width away from your toes. Keeping your heel flat to the floor and the stick vertical, move your knee as far forward as you can. Note any pinching, tightness, soreness, etc that you are experiencing (data you can use to help you address the mobility limitation). A good starting baseline is to have your knee reaching the stick. Beyond that shows there is opportunity to turn those passive ranges into strong, controllable ranges of motion. This test is an indicator of your base dorsiflexion mobility and will help you understand what you’re working with.
If you get a “good score” here, you can now spend more time building control and strength in your ranges. If the knee does not reach the stick and the heel lifts off to get you there, the calf and achilles range of motion needs to improve.
Active Dorsiflexion Test

Now that you understand your passive dorsiflexion, we can test it actively. This can be quite an eye opener if there’s a significant difference from passive to active range. Standing up tall, place your hands behind your back. Get into a wide lunge stance (place your back foot farther back than a normal lunge). Slowly guide the knee as far over the toe while moving into a deep lunge with the torso upright. Note any weakness, pain, pinching, tightness, discomfort, etc. from side to side. If there are discrepancies from passive to active range, you can begin working on building strength within your deeper ranges to bridge the gap.
Hips
Once you’ve tested your dorsiflexion, we can look at the hips to see what can improve there! The hips being a ball-in-socket joint have movement potential (especially within the squat). Let’s test a few different mechanics.
Seated Passive Internal Rotation (IR)

Hip IR is one of the top 3 most common mobility limitations that we see at Primal Mobility. It’s important to test this sucker and see where you stand (or sit?). Grab a band or strap and place it around your foot. While seated, put one hand on top of your knee to avoid letting the leg rise while pulling the band with the other hand to pull your femur into an internally rotated position within the hip. A good baseline for this is to have roughly 20-35º.
Seated Active IR
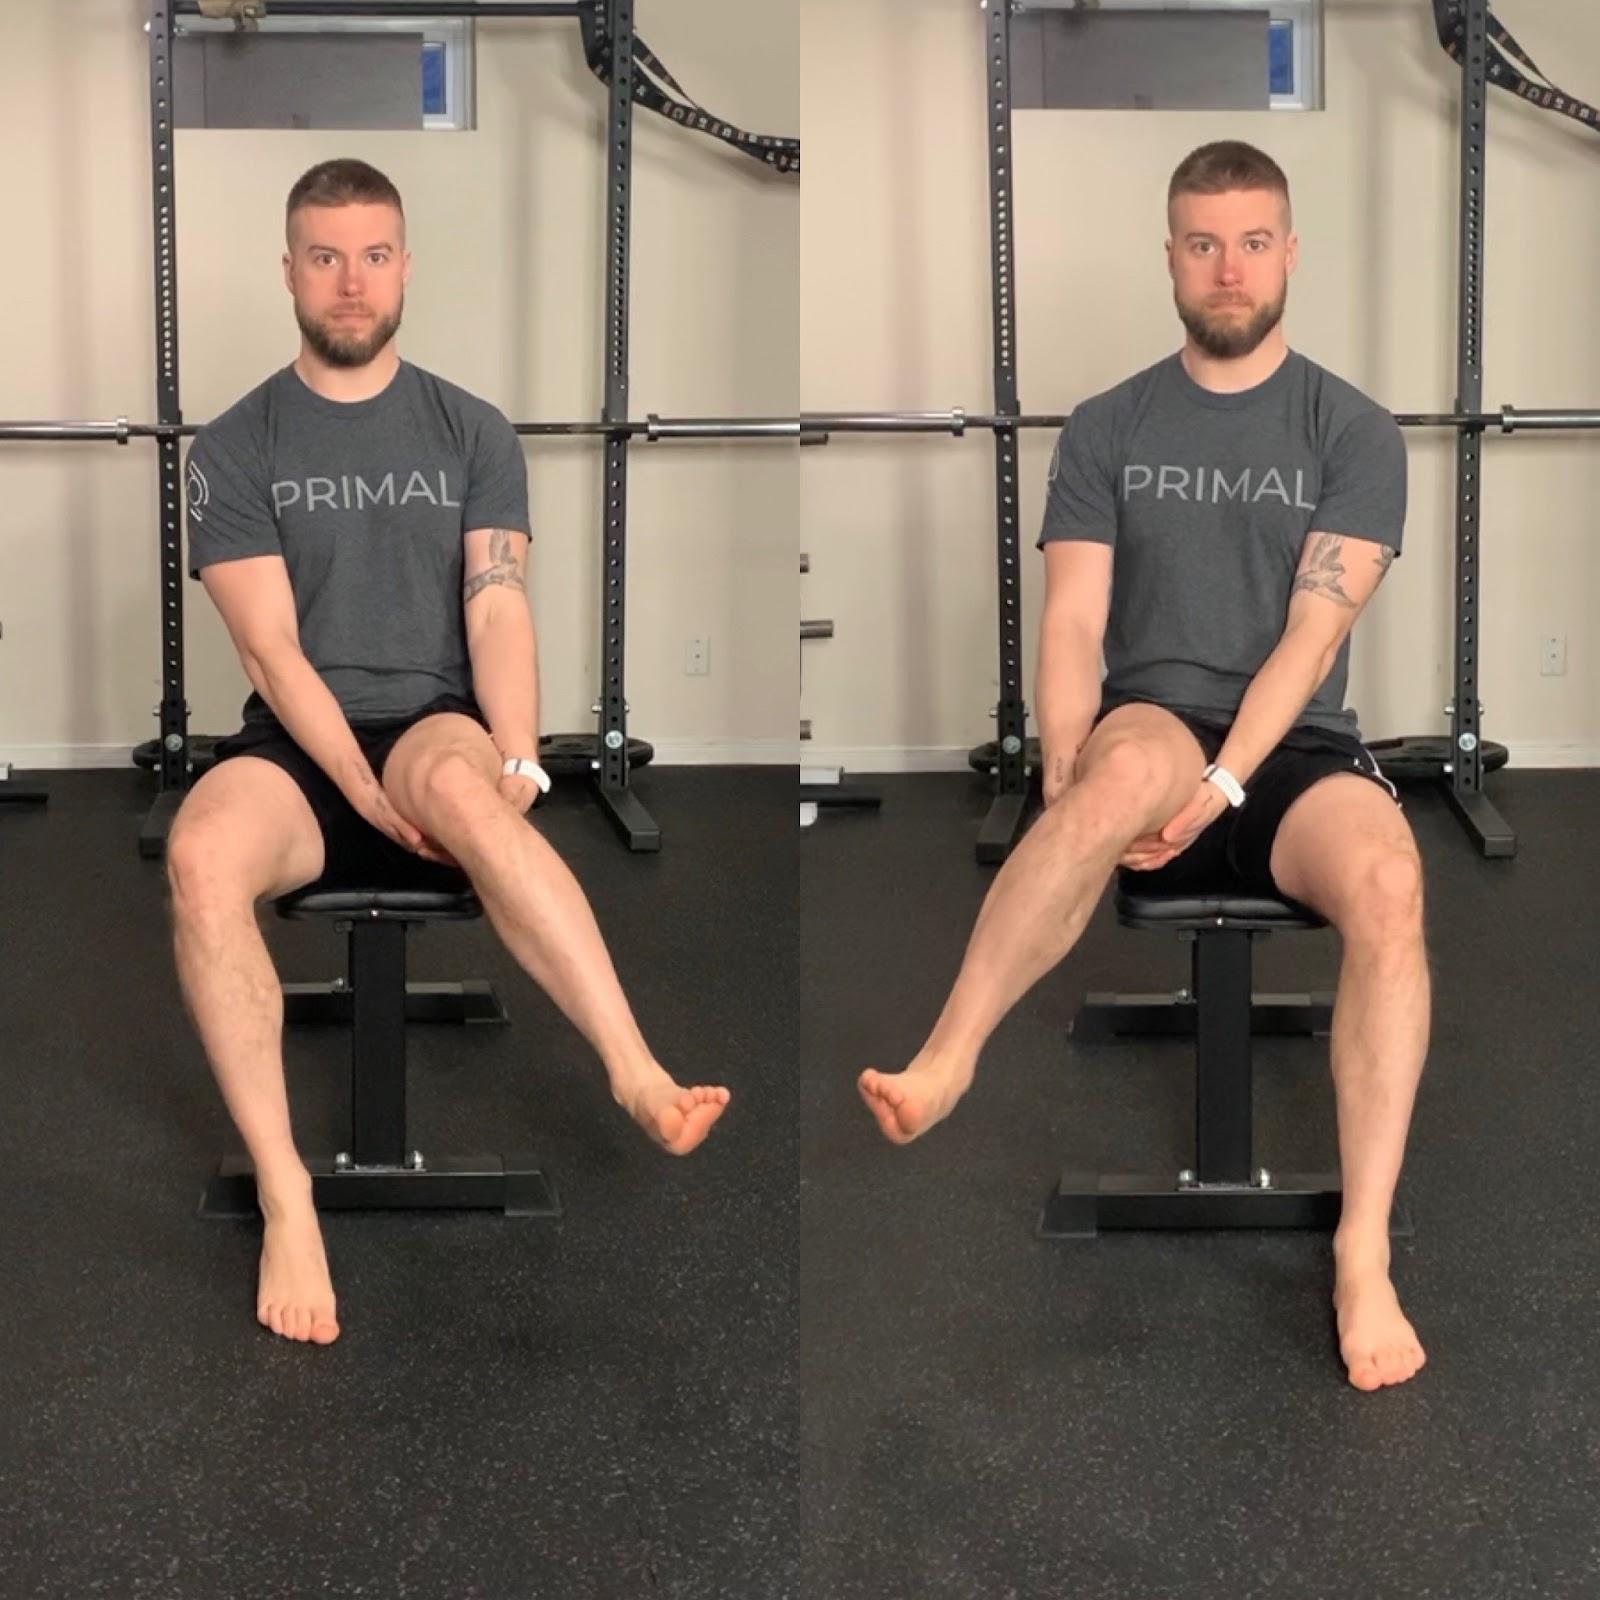
Now that we understand passive hip IR, let’s see how you can move with control. While seated, cup your hands behind your knee and hold your leg up slightly (avoid pulling the leg too high, you only want about an inch off the bench). Without moving the knee, kick the foot out to the side as far as you can. Hold that position for 5-10 seconds. If you feel you might cramp or begin to lose range of motion within that time, there is a lack of strength and endurance in your mobility.
Prone IR
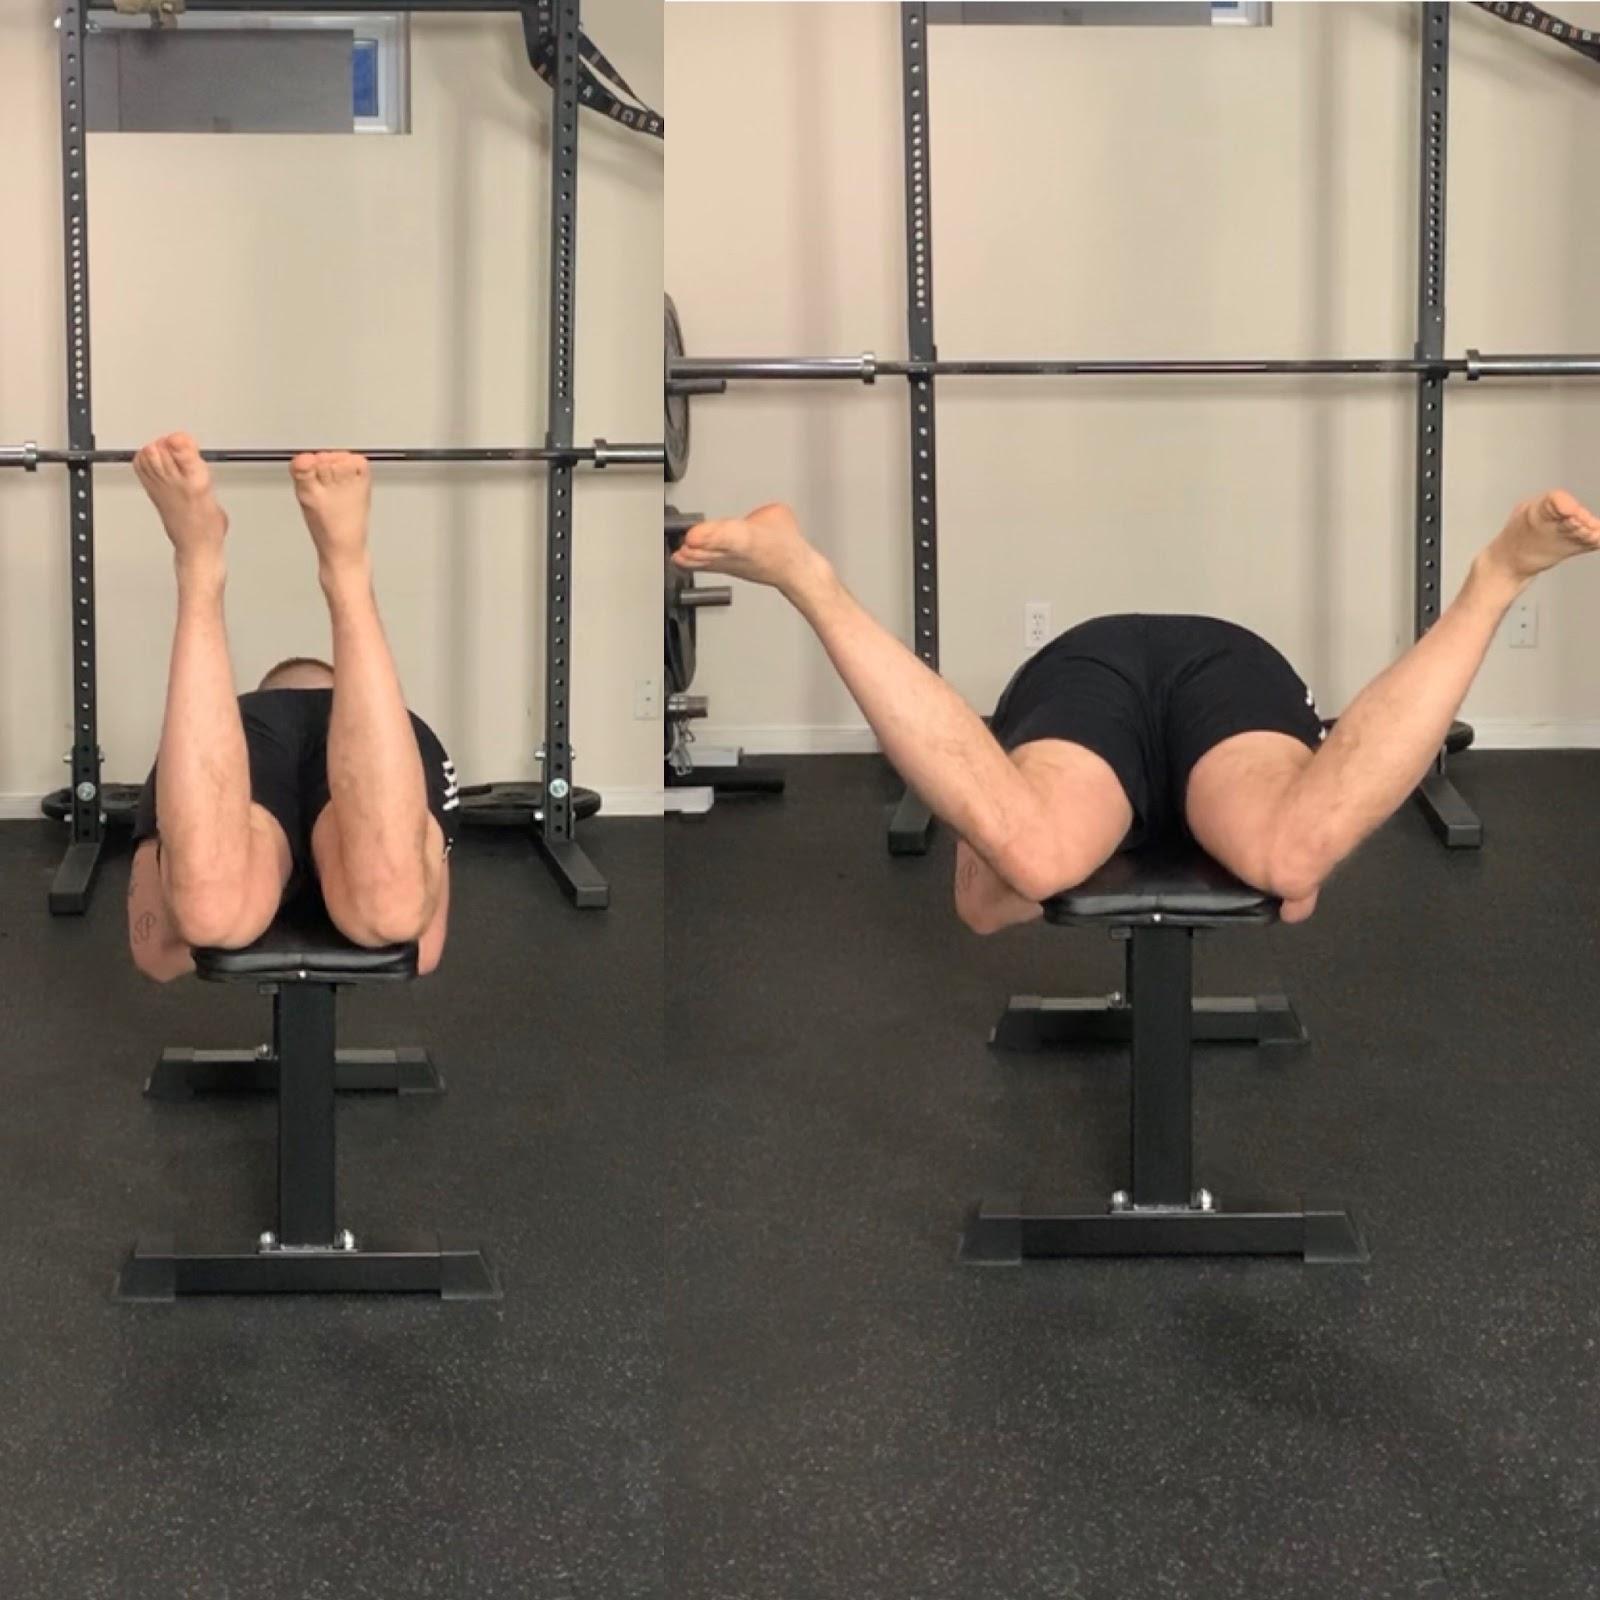
Sorry for the lovely view (or you’re welcome?)

This test is somewhat less relevant than the seated test as it does not mimic the squat position as much. In the prone test our hips are in extension while in the seated test our hips are in flexion. Which is a more accurate representation of what is happening with the hips during a squat. We want information that can give you more options to play around with! While laying flat on your stomach, bend your knees to 90º and pull your feet up toward the ceiling. Let your feet fall outward toward the floor and actively pull them into your end range. Notice if there are any discrepancies between your seated and prone tests. This will help to further understand your hips and what kind of lovin’ they need.
Seated External Rotation/Abduction

I know you didn’t ask, but here’s another lovely view for you.
I like this test because it shows you how the hips will respond in a deep squat like position. While seated on the floor, keep your torso as upright as possible and bend your knees to roughly 90º. Plant feet firmly onto the floor and make sure they remain flat (avoid rolling onto the inside or outside of the feet). Slowly walk the feet outward until you can relax your legs and they don’t fall inward or outward. Your knees should be directly in line with your feet and ankles. If you notice that your knees are buckling inward, you are moving your feet too far out and the hips don’t have that capability. We want to see how wide the hips can open and externally rotate while in this deep hip flexed (knees toward your chest) position. A good baseline is to have your knees just outside your torso width.
3: Finding Your Squat Stance
It’s time to start finding your squat stance now that we have solid information about your anatomy, anthropometry and current mobility
This piece of the journey is just that, a journey. Where you begin to experiment, test, fail, learn, feel and apply it all. There is no magic pill or one size fits all approach, it comes down to putting in the work and learning to listen to your body. Although, here are a few tips to help you along the way.
Tip 1: Film yourself
One of the best things you can do to understand your movements is to film yourself. If you’re a Primal Mobility member you know we ask you to film movements frequently (very frequently) and there's good reasoning behind that. It helps your coach understand how your body moves and responds to certain mobility techniques and coaching cues. It also helps you see where you’re compensating and what is happening in your movements when you feel certain things. The squat is no different. Turn your camera on and perform 5 reps of front, back and side angles. Now do it again with a slightly different stance. And again. What are you noticing in your movements as you change the stance? Don’t focus as much on feel here as you are mainly looking at how your body is moving for this practice.
Tip 2: Minimize distraction
Next, turn your camera off and feel all the feelings. Minimize distractions to focus on what your body is telling you. This is an acquired skill that takes time to build. Use the information gathered from watching your squat videos to help here. What you’re looking for (or feeling for) is smoothness. Some feelings of “tightness” will go away after you warm up, this practice is to find the stance that feels like putting a cold stick of butter on a hot flapjack (that was a delicious analogy). You should be able to feel most comfortable in this stance while cold. Play with your stances and tune in!
Tip 3: Apply it
At this stage you should already have a good idea as to what stance feels best. Now it’s time to apply it. Load it up in various ways (front squat, overhead squat, zercher, etc) and begin putting it to work with confidence. This is still a practice and learning your squat stance isn’t intended to be messed with at high loading %. When you start to add serious weight you will make sure you’re working within a stance that you are already comfortable in.
At this point you have likely found your favorite, most buttery squat stance.

If your stance changed, understand this is a process and to continue working on motor control within it. Fitness is a lifelong journey and you can always improve on where you currently are, that’s what makes it beautiful.
4: Lifters, Flat Shoes or Bare Foot?
All of these have their own benefits and drawbacks, I’m a big fan of variety. Regardless if you’re a crossfitter, weightlifter, powerlifter, or an alien, training your mobility in all sorts of ways will provide you with more movement options. Consider it this way - doing all of your squat specific mobility work bare foot won’t necessarily have the best carry over to your training if you only ever train with lifters (platformed weightlifting shoes). Your feet simply can’t perform at their best within the confines of shoes.
I believe in controlling your body with bare foot as it will provide you better opportunities to move effectively wearing any other footwear. This is why I do the majority of my mobility training bare foot. Moving my feet more freely applies my mobility gains to whatever I’m doing in my life. However, if I’m going to be using lifters for a squatting session I’ll likely only warmup barefeet with an empty bar and then get my lifters on for the rest of the session.
Lifters are a great tool to use to help gain more depth and apply more range of motion in your squats. This is valuable when you struggle to utilize your ranges normally and want a way to challenge them.
The simple answer to this question is to give yourself options. Apply variety and play around with it! Again, this is your mobility journey, I’m just along for the ride!
5: Squat Hold Protocol
Want to improve a position? Spend more time in it!
At Primal Mobility, this is one of the core statements that we say like a broken record. Our bodies will adapt to the positions that we spend the most time in. I hate to break it to ya, but if the only time you spend in a squat is the few seconds at the bottom of the rep…you might as well throw away the flapjacks, cuz it won’t feel too buttery! Here is a very basic protocol designed to be progressive. You can start from the beginning and build up regardless of current ability and hopefully without any muscle soreness impacting your training or recovery. Be sure to perform the holds within your ideal squat stance that you want to have comfort, confidence and control within!
One last thing, here is a quick breakdown of what an active vs passive squat hold is:
Passive Squat Hold: This variation of a squat hold is to get into your deepest squat position and sit there for the programmed duration of time. The goal is to get your butt as close to your heels as possible in a passive, resting manner. If you struggle to get into a deep squat and rest passively there, hold onto something in front of you or lean against a wall while doing it. Within a passive squat you will notice a bit of a butt wink (rounding of the lumbar spine) which is totally fine!
Active Squat Hold: You are no longer resting and are now active within your deepest squat position. An active squat hold will be challenging and you will feel your muscles engaged and burning to hold you in position. There should be no sign of a butt wink since you are actively working within a neutral spine. Hold this in your deepest possible active squat.
12-Week Protocol
To be completed 3-5 times per week in the squat stance that you want to improve
Week 1-2
- Accumulate 2 mins of passive squat hold: 15-30 sec sets
- Everytime you rest, perform 6-8 slow bodyweight squats.
- Rest as needed
Week 3-4
- Perform 8 slow bodyweight squats; on last rep move on to B
- Accumulate 2.5 mins of passive squat hold: 15-30 sec sets
- Rest as needed
Week 5-8
- Accumulate 2 mins of passive squat hold: 45-60 sec sets
- Accumulate 3 mins of active squat hold: 30 sec sets
- Rest max 30 sec
Week 9-12
- Accumulate 3 mins passive squat hold: Max holds
- Accumulate 5 mins of active squat hold: Max holds
- Rest max 30 sec
Conclusion
There is no ideal squat stance for everybody, but every body has an ideal squat stance. Mobility can play a huge part in how your squat feels and how you move in it, but it is not the only factor. Depth might also be limited by the stance you’re squatting in. A couple, simple tweaks can have you gain more comfort and efficiency overall which can make all the difference. Individual fitness is nuanced and mobility can seem confusing with everyone claiming to have the best approach. In reality, we need to simplify and focus on spending more time in the positions we want to improve. If you’re looking for help to make your squat more buttery, have a conversation with a Primal Mobility coach. We’ll set you up with a step by step approach to get there.

#BeMorePrimal
-Coach Matt
Other Resources You'll Love:

